
Fill up the form to request for a quote or schedule for a free appointment. We’ll get back to you as soon as possible.
A dryer works by pushing out hot, moist air so that your clothes can dry. If your dryer vent to the outside becomes blocked by lint, the atmosphere will not be able to expel moisture as it was designed to do.
The outcome will be trapped moisture which requires more heat energy to evaporate.
Keeping your dryer vents clean is essential for a variety of reasons that include not only energy savings but safety.
If you begin to notice one of these things, it is likely you have a lint issue.
Clothing is supposed to be hot and fresh from the dryer, right? Wrong.
If your clothes – or your dryer are noticeably hot to the touch at the end of a cycle, it means that the dryer isn’t exhausting through the port properly.
Everything overheats – and overheating is never a great thing.
If your dryer is properly installed, lint should not collect excessively from the exhaust vent or dryer hose, especially if you’re cleaning the dryer vent screen frequently after each use.
Your dryer drum should not need cleaning if you don’t regularly dry pet items or sandy, gritty clothes.
Always proactively shake out any hair or grit, and perhaps wipe down the drum using a moist cloth after drying these products.
Bad news – lint is very flammable, and when it builds up in the exhaust port, lint trap, and drum casing, it may actually catch on fire. Between 2010 and 2014 there were nearly 16,000 home fires reported to U.S. Fire Departments – and the majority of them were due to dryers.
In a third of the dryer fires, lint build up was a leading element.
If the dryer duct hood flap does not open, you likely have lint build up there and at the dryer hose.
This is a fantastic time to clean out the lint – or have a professional do it for you.
All clothes dryers have various types of filters to catch the lint generated as clothing tumbles inside the dryer, but the filters can’t catch all the lint.
Some amount of lint inevitably passes into the ductwork leading to the outdoor vent, and appropriate maintenance requires you to clean this ductwork regularly.
The U.S. Fire Administration reports that every year more than 2,900 home fires are started by clothes dryers, and the leading cause of these fires is a buildup of lint due to lack of simple maintenance on the part of the owner.
Each load of laundry which moves through your washing machine also makes its way to your clothes dryer contains lint–mostly little particles of cloth and fiber which are loosened from clothing from the action of agitating water.
The removable lint filter in your dryer simply can’t catch all the lint freed from clothing.
The lint which makes it past the filter becomes trapped in crevices deep inside the lint filter trap and all along the dryer ductwork as it makes its way to the external vent opening.
After the lint builds up, they restrict airflow and lead to overheating, which can spark the lint itself.
There are several warning signs that dangerous lint buildup has happened in your dryer ductwork system, indicating that it needs a thorough cleaning:
The flexible plastic or metal foil ductwork which was once commonly used to connect dryers to external vents are banned by most local building codes.
These vent tubes have been popular because of the ease by which they may be routed through difficult spaces, but since their interior surfaces are ribbed, they can easily catch lint and trigger fires due to overheating.
In case you have one of those flexible ducts installed, it’s best to replace it with smooth-walled metal ductwork approved for this particular use.
If you can not remove and replace the old ductwork, then it should be regularly removed and cleaned from one end to another.
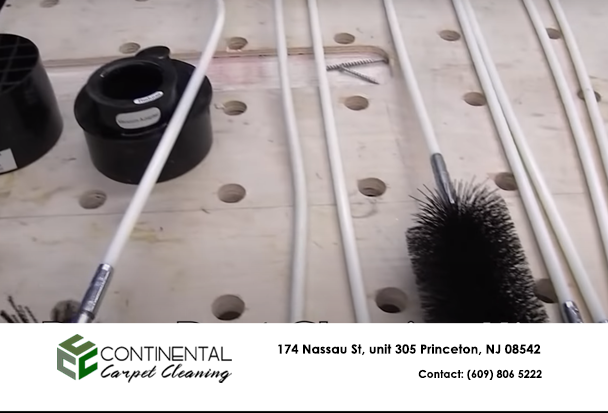
Brush kits come with a long-bristle brush to clean out the lint filter area, in addition to a round-bristled brush that could clean out a 4-inch round rigid dryer duct–the kind you need to need for all concealed portions of your duct run.
The round brush tip fastens to a flexible fiberglass shaft which could be lengthened in sections.
Note:
Some brush kits could be connected to a portable drill to spin the brush inside the duct. If you use this option, run the drill at slow speed and advance the brush slowly through the duct.
Unplug the dryer’s power cable, and switch off the gas valve at the dryer (for gas dryers).
Disconnect the duct joint closest to the dryer, then gently pull the dryer away from the wall.
Disconnect the remaining exposed sections of dryer duct. If the sections are recorded, remove and discard the tape.
Tip
If you don’t have a dryer vent brush kit, you can use a long-handled scrub brush to clean short sections of rigid duct. Even though the brush has a limited reach, you can clean each duct section by brushing from both ends.
Vacuum the inside of the lint trap housing, using a long, skinny hose attachment for your vacuum cleaner.
Follow the first vacuuming with a second pass, using the long flexible brush in the brush kit.
Extend the brush all the way to the bottom of the cavity, then gently pull the brush out of the dryer housing.
Wash the brush bristles with the vacuum cleaner.
Repeat as needed until there is not any more lint which may be taken out of the cavity.
Attach the round-duct brush head to the flexible fiberglass shaft, following the brush kit manufacturer’s directions.
Insert the brush into each duct section and sweep it clean by using a rotating motion when moving the brush back and forth. Pull the brush out and clean the head frequently.
Clean out the rest of the duct run with the same methods, adding more sections of the flexible shaft as needed to get to the end of the rigid duct. Repeat until no more lint comes out of the duct.
Check the vent cap at the outside end of the duct to be certain it’s clean and its flapper door works properly.
Check For Kinked Hose Behind Dryer
When dryers are located a short distance from an outside wall, the short, straight exhaust duct runs worked well, and leaves little need for maintenance and making inspecting easy.
Many laundry rooms today are situated deeper inside homes with long runs and several elbows, often resulting in restrictive airflow. Many times these pipes are buried in finished ceilings or floors.
Removing white plastic flex pipe
There should be no sheet-metal screws, rivets or any other fastener used to connect the duct joints.
Fasteners that extend into the airway will catch lint and obstruct airflow. Clamps or foil duct tape should be used to secure joints.
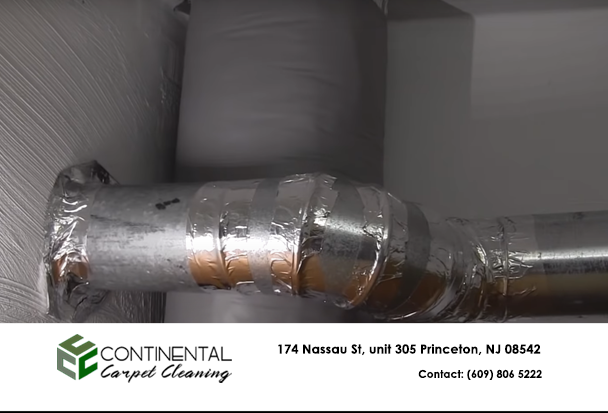
Avoid White or Mylar Spiral Type Duct
Mylar-covered spiral wire duct was popular for awhile and replaced the white vinyl duct. Mylar is a shiny metallic-coated polyester film, and it is slightly more heat-resistant than vinyl, but still presents a fire hazard. The use of solid all-metal exhaust ducts is now the standard, code-approved, and solid piping is still the BEST method for venting.
Look for sags in the dryer exhaust duct-pipe run. This happens when the pipe is not properly supported and the sag cab create a restriction, preventing all the moisture and lint from blowing out.
When the ductwork is in great shape, turn on the gas valve (for gas dryers) and plug in the dryer.
Push the dryer back into its usual position, making sure none of the ductwork is kinked or deformed by this action.
To find out more on Continental Carpet Cleaning, how to schedule your next dryer vent cleaning, or any of our other services, please contact us now.
Don’t forget to ask us about our exclusive 100% satisfaction guarantee!
When you consider that 15,000 fires start in the laundry room every year and that these fires are mostly due to lint build up in the clothes dryer or a clogged dryer duct it makes you wonder why we don’t do something about it. Annual dryer duct cleaning will ensure you avoid these possible issues.
Determining if your dryer duct is full of lint and in need of cleaning can be straightforward. The clue is noticing if your clothes dryer is taking longer to dry a load of clothes, actually taking two and three cycles to dry clothes that once dried in one.
If your clothes come out hot after the last cycle then you can usually rule out your your heating element and suspect a blocked duct.
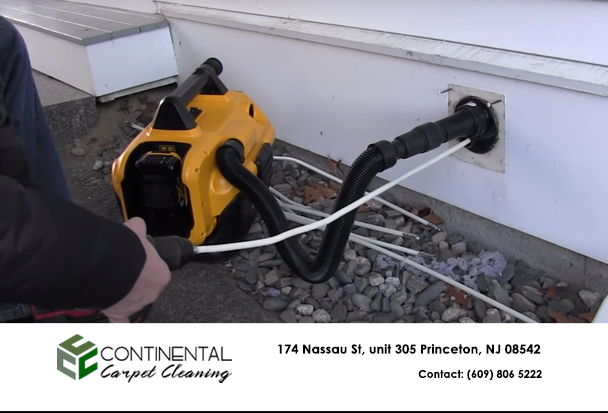
Inspect the exterior vent flap when the dryer is in use. Make sure there are no exterior obstructions like bird, mouse or bee nests. The air velocity should open this vent wide open.
If the exterior flapper barely opens then your airflow is minimal and your duct may need to be cleaned or shortened.
Clues Your Dryer Duct Is Clogged
Before you clean our your dryer duct, it’s a good idea to see if you have the correct type of pipe installed, and if it was installed properly to operate safely.
Inspect the rear of the dryer and ensure that the was not pushed in too far, resulting in the dryer duct being crushed. This condition would also slow air flow and create a lint trap. A good dryer to pipe transition is the “Periscope-type connector.” I like these connectors because they eliminate the common problem of kinked and crushed transition ducts behind the dryer.
Dryer ducts should be UL-approved 4″ metal material and all the joints sealed with metal foil tape. The metal tape helps seal off air leaks form the system and makes the air flow more efficient. Avoid using metal screws or white plastic flex pipe.
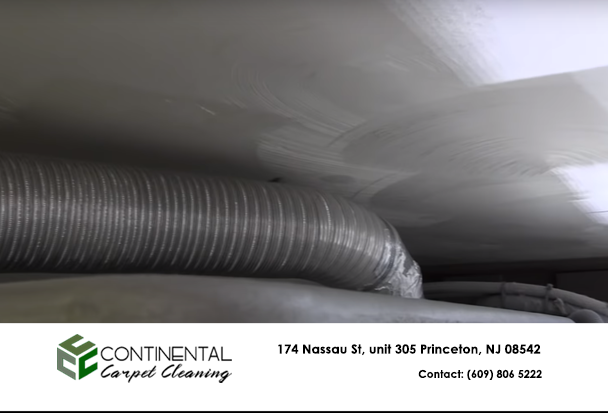
Insulate Any Vent Pipe In Unheated Spaces
Ensure that any dryer ducts traveling through unheated attic or eve spaces are insulated. Un-insulated pipe will sweat or create frost and interior lint build up.
Dryer Duct Best Practices
Use rigid aluminum or rigid galvanized steel duct (especially if concealed). If flexible metal duct must be used, use the semi-rigid type.
The dryer duct should be as straight and short as possible. Minimize 90-degree turns. Sharp turns cause back pressure and create resistance to airflow. Two 45-degree bends are more efficient than one 90-degree bend. For best performance, separate all turns by 4 feet of straight duct.
Duct joints should be wrapped with foil tape to make air and moisture tight.
New Jersey’s Leading & Trusted Professional Carpet Cleaning Service. We provide professional carpet cleaning, tile and grout cleaning, air duct cleaning, area rug cleaning and water damage restoration for your home and office.
Copyright © 2021. Continental Carpet Cleaning. All Rights Reserved.